Diamond Springs & Western
Scratchbuilt Windows
Scratchbuilt Windows
Introduction
Most of this technique for scratchbuilding windows came from an article by Paul Schenk in the January 1976 Narrow Gauge And Shortline Gazette. As this issue is hard to find, I'll repeat all the steps here. Also I adapted the techniques for styrene, while Paul used stripwood for his model of the Hancock depot.
Construction
- Cut the openings for your windows into the walls for your building. Usually this is done best before cutting the walls from the sheet material.
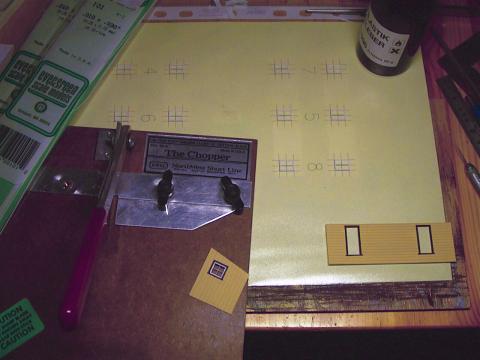
- A piece 2"x10" is used for the window sill with 2" projecting at the exterior. Frame the opening using 4"x6" strips, starting with the top. The picture at the top shows a wall after this step (lower right).
- Now measure all the openings exactly to make sure the casings will fit.
 Create a template for all the window casings. I did use a cheap CAD package for
my PC as this allows to easily duplicate the parts. A program that allows entering
the dimensions via the keyboard is probably the best here. First draw the outlining
rectangle, then add the muntins. Note that for double hung windows, the height is
half of the total height plus the width of the casing frame (0.020"). Extend the lines
to the outside to make positioning the strips easier. The result should like similar to
the drawing on the right. The numbers are used to assign the casing to the appropriate
opening.
Create a template for all the window casings. I did use a cheap CAD package for
my PC as this allows to easily duplicate the parts. A program that allows entering
the dimensions via the keyboard is probably the best here. First draw the outlining
rectangle, then add the muntins. Note that for double hung windows, the height is
half of the total height plus the width of the casing frame (0.020"). Extend the lines
to the outside to make positioning the strips easier. The result should like similar to
the drawing on the right. The numbers are used to assign the casing to the appropriate
opening.
- Print ( or draw ) the template on a sheet of colored paper. This will make it much easier to align the small pieces of strip styrene. It's really worth the effort to find some of that paper. Believe me, white styrene is almost invisible on a white background! Print another set of templates on normal paper (or make a photocopy if you draw by hand).
- Put the resulting template into a clear sleeve. Make sure that the glue you plan to use doesn't attack that sleeve. Usually this is not a problem, but who knows what type of wonder glue you're using.
- Mask off everything except for the area with the windows and spray with 3M Spray Mount.
- Now comes the fiddly part: cut to size the casing frames from 0.010"x0.020" strips
and align them as exactly as possible on the templates. Repeat for the muntins which
are cut from the same size and are put in place on edge. Once everything is aligned properly, glue at all corners.
Caution:The plastic glue dissolves the Spray Mount temporarily, so be very careful if you need to re-align parts at this step. - Let dry throughly and relax as the most difficult part is over now.
- Sand the muntins flush with the frames and carefully remove the casings using a razor blade.
- Glue in place, starting with the upper half for double hung windows, and you're finished.