Diamond Springs & Western
Narrowing Tichy Ore Cars
Narrowing Tichy Ore Cars
Preface
Several years ago RMC ( issue March 91 ) ran an article by Al Rost about converting Tichy Ore Cars to narrow gauge.
Back then I built two cars following these ideas. While it worked well, I didn't like the looks
of the wide cars next to my more typical narrow gauge cars.
When I was looking around for ore cars to use on my planned HOn3 layout
I remembered that conversion.
This time I decided to create a narrower version of the same car.
I don't have the original article in my collection anymore, so I can't compare my way to the one suggested by Al. If there
are similarities, these methods are the invention of Al and I only adopted them.
Part List
- Tichy 22 Foot Wood Ore Car #4012
- HOn3 trucks of choice ( I used MDC HOn3 Archbar Trucks #2928 )
- Evergreen 4x4 styrene strips
- Bits and pieces of styrene
Modifying the slope sheet
 The first step of the conversion is to narrow the slope sheet. A table saw is extremely
helpful here. In case you don't have access to one, cutting by hand would as
well be possible, but would better be done with a different procedure.
The first step of the conversion is to narrow the slope sheet. A table saw is extremely
helpful here. In case you don't have access to one, cutting by hand would as
well be possible, but would better be done with a different procedure.
- Decide on the new width of the finished car by measuring some of your existing rolling stock. My car is reduced to a total width of 8 scale feet.
- Each side adds 8 scale inches to the overall width, so subtract 1'4" from the total width.
- This gives you the necessary width for the slope sheet after the cutting is done. Divide by 2 and set up the fence of your table saw to that width (3'4" in my case).
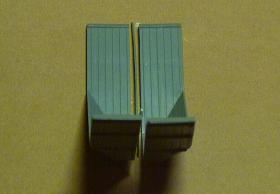
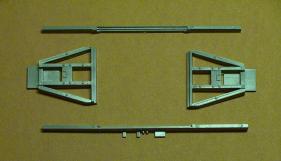
- Cut the slope sheet carefully. take the wider part and cut again. As shown on the first picture, this should give you two smaller halves and a small strip.
- Discard the small strip and test fit the two halves. Sand where they don't fit exactly.
- Glue the two halves together, aligning them carefully.
- If you want to, you can add small pieces of 4x4's to the bottom to replace the molded on pieces that where removed in the process.
- If you want to convert several cars, this is the time to cut all slope sheets, as we'll have to change the setup of the table saw for the frame modifications.
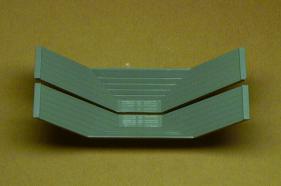
- Now glue the sides (C-3) to the slope sheet. Doing so at this time makes fitting the frame easier.
Frame modification
In order to modify the mounting area for trucks and couplers as little as possible I used the following approach to convert the frame.
 Remove the cast on coupler boxes and other detail on the underside of the frame.
The details I'm talking about are marked black on the picture. I did so by
first cutting them off and then sanding everything smooth.
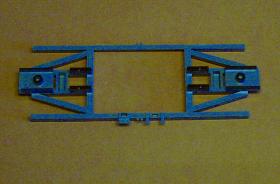
Remove the cast on coupler boxes and other detail on the underside of the frame.
The details I'm talking about are marked black on the picture. I did so by
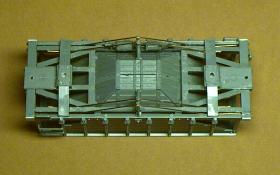
first cutting them off and then sanding everything smooth.- The little recess in the truck mounting area has to be filled with some scrap styrene. Sand smooth after the glue has dried.
- The photo below shows the underside of the frame after the modifications are completed. Now it's time to narrow it to fit under the modified hopper.
 Now cut off the outer side beams first. This can
easily be done without a table saw. Cut as close to the sidebeams as possible.
Now cut off the outer side beams first. This can
easily be done without a table saw. Cut as close to the sidebeams as possible.- If you plan to use a table saw, the small mounting details for the brake parts might make it difficult to use the fence of your saw properly. I solved that situation by laying a steel ruler between the fence and the underframe.
- Now narrow down the underframe to the required width by filing off material from the center parts of the frame. Some care has to be taken here to make sure that you remove same amount from both sides of the triangular sections and from both end parts.
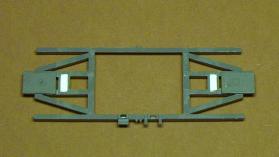
 After these changes done, you should have four parts as on the photo to the right.
Make sure that everything fits nicely between the sides of your hopper.
After these changes done, you should have four parts as on the photo to the right.
Make sure that everything fits nicely between the sides of your hopper.- This is probably the most difficult step of the whole modification. The frame parts have to be glued together again and everything has to be square.
- While I didn't do so, you can make that step easier by removing all the NBWs and other detail from the upside of the frame parts as this would give you a level area to align everything.
- Glue one triangular part to the sidebeam, making sure that the ends are properly aligned and the crossbeam on which the hopper sits is on a right angle to the side. Repeat for other two parts.
- After glue has set, glue the two halves together again checking for alignment at the ends. Voila, your new frame is completed.
Final Assembly
The last few steps follow the original instructions closely and can be carried out quite fast.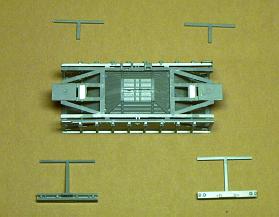 Remove the ridges from the supports (parts C-1 and C-2) as
they won't help you on the modified hopper
Remove the ridges from the supports (parts C-1 and C-2) as
they won't help you on the modified hopper
- Narrow the supports for your new width. C-2 should be narrowed to the same width as the frame. Glue small pieces of 0.020" styrene to the ends and sand to shape. This will give you the proper overhang on the sides. Also it is much easier to do than trying to fill with putty.
- The intermediate supports (C-1) were poorly molded on my kit, so I cut off the outer risers. Glue parts C-1 in place. Using a few pieces of 4x4 styrene strips replace the cut off risers.
- Glue the end beams / supports (C-2) in place.
-
 Carefully mark the center line of the car and drill the holes for mounting
the couplers of your choice. I use Microtrains N scale couplers as they are
available assembled.
Carefully mark the center line of the car and drill the holes for mounting
the couplers of your choice. I use Microtrains N scale couplers as they are
available assembled.
- My choice of trucks (MDC HOn3 Archbar Trucks #2928) allow the usage of the truss rods and king posts B-2 as supplied. Depending on your trucks you might have to modify them. Glue in place as described in the instruction sheet.
- The body bolsters C-5 have to narrowed and filed down before attaching them to the frame. Make sure that the coupler height is correct and the trucks can swivel freely.After the glue has dried, drill out the hole for the truck mounting screws.
 Add all the remaining detail parts as described in the instruction sheet.
- Parts C-6 and B-5 have to be narrowed as well. Most difficult is B-5, so if you plan to run the car loaded just leave it off, as it won't be seen anyway.
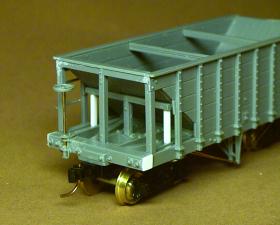
- The photo to the right shows the brake wheel end of the finished cars. The added risers for the intermediate supports and the new ends of the end beams are clearly visible.
- Paint and weather to your liking - and you're finished!